Getting Started with Liquibase and Spring Boot
Introduction
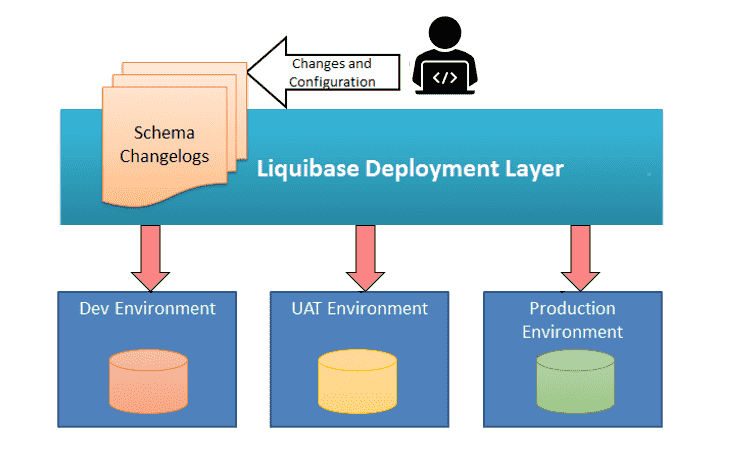
Liquibase is a popular database schema version control tool that allows you to manage your database changes in a more efficient and automated way.
Take a look at our tutorial to get more details about liquibase and database version control: Database Version Control with Liquibase: A Complete Guide.
Spring Boot is a powerful Java framework for building microservices and web applications.
In this tutorial, we’ll learn how to integrate Liquibase with Spring Boot to manage database schema changes.
Prerequisites
To follow this tutorial, you’ll need the following:
- Java 8 or later installed on your computer.
- Basic knowledge of Spring Boot and databases.
- A favorite IDE or text editor for writing code.
- A database server such as MySQL, PostgreSQL, or Oracle.
Step 1: Create a Spring Boot Project
First, let’s create a new Spring Boot project using the Spring Initializr web service. Go to https://start.spring.io/ and select the following options:
- Project: Maven Project
- Language: Java
- Packaging: Jar
- Java: 8 or later
- Dependencies: Web, JPA, MySQL Driver (or the driver for your preferred database)
Click on “Generate” to download the project files. Extract the files and import the project into your favorite IDE.
Step 2: Configure the Database
Next, let’s configure the database connection settings in the application.properties file. Add the following properties to the file:
spring.datasource.url=jdbc:mysql://localhost:3306/mydb
spring.datasource.username=root
spring.datasource.password=mysecretpassword
spring.jpa.hibernate.ddl-auto=none
spring.liquibase.enabled=true
spring.liquibase.change-log=classpath:db/changelog/db.changelog-master.xml
Replace mydb, root, and mysecretpassword with your own database name, username, and password.
The spring.jpa.hibernate.ddl-auto=none property disables Hibernate’s automatic schema generation, and the spring.liquibase.enabled=true property enables Liquibase.
Step 3: Create a Liquibase Changelog File
Next, let’s create a Liquibase changelog file. Create a new directory called db/changelog under the src/main/resources directory. Then, create a new file called db.changelog-master.xml in the db/changelog directory.
Add the following XML code to the db.changelog-master.xml file:
<?xml version="1.0" encoding="UTF-8"?>
<databaseChangeLog
             xmlns="http://www.liquibase.org/xml/ns/dbchangelog"
             xmlns:xsi="http://www.w3.org/2001/XMLSchema-instance"
             xsi:schemaLocation="http://www.liquibase.org/xml/ns/dbchangelog
             http://www.liquibase.org/xml/ns/dbchangelog/dbchangelog-3.8.xsd">
    <changeSet id="1" author="yourname">
       <createTable tableName="users">
          <column name="id" type="INT" autoIncrement="true">
             <constraints primaryKey="true" nullable="false"/>
          </column>
          <column name="name" type="VARCHAR(50)">
             <constraints nullable="false"/>
          </column>
          <column name="email" type="VARCHAR(100)">
             <constraints nullable="false" unique="true"/>
          </column>
       </createTable>
   </changeSet>
</databaseChangeLog>
This changelog file creates a new table called users with three columns: id, name, and email.
Step 4: Run the Application
Now, let’s run the Spring Boot application. Right-click on the Application.java file and select “Run” or use the command mvn spring-boot:run in the terminal.
Once the application starts, Liquibase will automatically create the users table in the database.
You can verify this by connecting to the database and running the following SQL query:
SELECT * FROM users;
Step 5: Add More Changesets
To add more changesets to the Liquibase changelog file, create a new XML file under the db/changelog directory and add the changeset XML code.
For example, let’s create a new file called db.changelog-1.1.xml with the following XML code:
<?xml version="1.0" encoding="UTF-8"?>
<databaseChangeLog
          xmlns="http://www.liquibase.org/xml/ns/dbchangelog"
          xmlns:xsi="http://www.w3.org/2001/XMLSchema-instance"
          xsi:schemaLocation="http://www.liquibase.org/xml/ns/dbchangelog
          http://www.liquibase.org/xml/ns/dbchangelog/dbchangelog-3.8.xsd">
   <changeSet id="2" author="yourname">
      <addColumn tableName="users">
         <column name="age" type="INT"/>
      </addColumn>
   </changeSet>
</databaseChangeLog>
This changeset adds a new column called age to the users table.
Step 6: Update the Database
To apply the new changeset to the database, simply restart the Spring Boot application.
Liquibase will automatically detect the new changeset and apply it to the database.
You can verify that the age column has been added to the users table by running the following SQL query:
DESCRIBE users;
Conclusion
In this tutorial, we learned how to integrate Liquibase with Spring Boot to manage database schema changes.
We created a Liquibase changelog file, configured the database connection settings, and ran the Spring Boot application to automatically create the database schema.
We also learned how to add more changesets to the changelog file and update the database schema.
Using Liquibase with Spring Boot makes it easier to manage database schema changes in a more efficient and automated way.
It also ensures that your database schema is always in sync with your application code.