Maven Tutorial For Beginners
In this maven tutorial, we will start explaining maven and after that, we will present the most used commands in maven.
Introduction:
Apache Maven is a software project management and comprehension tool. Based on the concept of a project object model (POM), Maven can manage a project’s build, reporting, and documentation from a central piece of information. Using maven we can build and manage any Java-based project.
Why Use Maven?
The key features of Maven are:
- Automate certain tasks: compilation, unit tests, and deployment of the applications that make up the project
- Dependency management including automatic updating.
- simple project setup that follows best practices.
- isolation between project dependencies and plugins.
- A large and growing repository of libraries.
- Generate documentation concerning the project.
Maven Installation:
Step 1: Verify Java:
Maven is a Java-based tool, so the very first requirement is to have JDK installed on your machine.
To verify Java Installation on your Machine run this java command java -version
Result:

If you don’t have java already installed and the JAVA_HOME configured yet, or you get this error 'java' is not recognized as an internal or external command, operable program or batch file. Refer to this post to install and configure the JAVA_HOME environment variable.
Step 2: Install Maven:
a- Download and extract Maven:
Download maven latest version from the apache maven website, for example: apache-maven-3.6.3-bin.zip, Then Extract the archive, to the directory you wish to install Maven 3.6.3. The subdirectory apache-maven-3.6.3 will be created from the archive.
b- Setup Maven Environment Variables:
Right-click on MyComputer -> properties -> Advanced System Settings -> Environment variables -> click new button.
Then, add M2_HOME, M2, MAVEN_OPTS to environment variables:
M2_HOME=C:\apache-maven-3.6.3
M2=%M2_HOME%\bin
MAVEN_OPTS=-Xms256m -Xmx512m
Result:

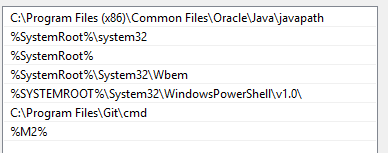
c- Add Maven Path in an environment variable:
Append the string; %M2% to the end of the system variable, Path.
d- Verify Maven Installation:
To verify whether maven is installed or not, open the command prompt and write:
mvn −versionit will display the version of maven and JDK including the maven home.
Result:

Maven POM(Project Object Model):
POM is a fundamental unit of work in Maven. It is an XML file that resides in the base directory of the project as pom.xml.
The POM describes the project, manages dependencies, and configures plugins for building the software.
The POM also defines the relationships among modules of multi-module projects. Let’s look at the basic structure of a typical POM file:
<project xmlns = "http://maven.apache.org/POM/4.0.0"
   xmlns:xsi = "http://www.w3.org/2001/XMLSchema-instance"
   xsi:schemaLocation = "http://maven.apache.org/POM/4.0.0
   http://maven.apache.org/xsd/maven-4.0.0.xsd">
   <modelVersion>4.0.0</modelVersion>

   <groupId>com.elgarnaoui.project-group</groupId>
   <artifactId>project</artifactId>
   <version>1.0</version>
</project>
Maven Coordinates:
The POM defined above is the bare minimum that Maven allows, groupId:artifactId:version. The three fields act much like an address and timestamp in one. This marks a specific place in a repository, acting like a coordinate system for Maven projects:
- groupId: a unique base name of the company or group that created the project (groupId do not need to be explicitly defined if they are inherited from a parent)
- artifactId: a unique name of the project (version do not need to be explicitly defined if they are inherited from a parent)
- version: a version of the project
packaging:
A packaging method (pom, jar, maven-plugin, ejb, war, ear, rar).
<project xmlns="http://maven.apache.org/POM/4.0.0"
  xmlns:xsi="http://www.w3.org/2001/XMLSchema-instance"
  xsi:schemaLocation="http://maven.apache.org/POM/4.0.0
                      http://maven.apache.org/xsd/maven-4.0.0.xsd">
  ...
  <packaging>war</packaging>
  ...
</project>
When no packaging is declared, Maven assumes the packaging is the default: jar.
POM Relationships:
One powerful aspect of Maven is its handling of project relationships: this includes dependencies (and transitive dependencies), inheritance, and aggregation (multi-module projects).
Dependencies:
Most projects depend on others to build and run correctly, we call these dependencies, Maven manages this list of dependencies for you, it’s downloaded and links the dependencies on the compilation, as well as on other goals that require them. Maven also brings in the dependencies of those dependencies (transitive dependencies).
To declare a dependency on an external library, you need to provide the groupId, artifactId, version, and other optional information if you need them like type, scope, and optional of the library.
  <dependency>
      <groupId>org.springframework</groupId>
      <artifactId>spring-core</artifactId>
      <version>4.3.5.RELEASE</version>
      <type>jar</type>
      <scope>test</scope>
      <optional>true</optional>
</dependency>- groupId, artifactId: directly the corresponding coordinates of the dependency,
- version: a dependency version requirement specification,
- type: the dependency type. This defaults to
jar, The type often corresponds to the packaging used:jar,ejb-client,test-jar… - scope: There are five scopes available:
- compile
- provided
- runtime
- test
- system
- optional: the project does not require this dependency in order to work correctly
Exclusions:
Maven allows you to exclude a transitive dependency if you do not wish to use it.
<dependency>
      <groupId>org.apache.maven</groupId>
      <artifactId>maven-embedder</artifactId>
      <version>2.0</version>
      <exclusions>
        <exclusion>
          <groupId>org.apache.maven</groupId>
<!--make asterisk * to exlude all transitive dependencies-->
          <artifactId>maven-core</artifactId>
        </exclusion>
      </exclusions>
 </dependency>
Super POM:
All Project Object Models (POM) inherit from a base Super POM. This base POM is known as the Super POM and contains values inherited by default.
You can take a look at how the Super POM affects your Project Object Model by creating a minimal pom.xml and executing on the command line:
mvn help:effective-pomProperties:
Maven properties are value placeholder, can help to make your pom.xml file easier to read and maintain. You can use properties to define versions of your project’s dependencies. Maven properties are accessible anywhere within pom.xml.
<properties>
    <spring.version>4.3.5.RELEASE</spring.version>
    <project.build.sourceEncoding>UTF-8</project.build.sourceEncoding>
</properties>
<dependencies>
...
    <dependency>
        <groupId>org.springframework</groupId>
        <artifactId>spring-core</artifactId>
        <version>${spring.version}</version>
    </dependency>
...
</dependencies>
Repositories:
Maven Repositories are collections of artifacts that adhere to the Maven repository directory layout.
Repositories exist as a place to collect and store artifacts. Whenever a project has a dependency upon an artifact, Maven will first attempt to use a local copy of the specified artifact. If that artifact does not exist in the local repository, it will then attempt to download from a remote repository.
The default local repository is located in the .m2/repository folder under the home directory of the user. And the default central repository is Maven Central.
you can configure other or alternate repositories as follows:
<repositories>
    <repository>
      <releases>
        <enabled>false</enabled>
        <updatePolicy>always</updatePolicy>
        <checksumPolicy>warn</checksumPolicy>
      </releases>
      <snapshots>
        <enabled>true</enabled>
        <updatePolicy>never</updatePolicy>
        <checksumPolicy>fail</checksumPolicy>
      </snapshots>
      <name>Nexus Snapshots</name>
      <id>snapshots-repo</id>
      <url>https://oss.sonatype.org/content/repositories/snapshots</url>
      <layout>default</layout>
    </repository>
  </repositories>
For example, the JBoss server dependency does not exist on the maven default repository, then you can add an alternate:
<repositories>
    <repository>
        <id>JBoss repository</id>
        <url>http://repository.jboss.org/nexus/content/groups/public/</url>
    </repository>
</repositories>
Build setting:
The build is an important element of the Maven POM. its provide information about goals and other useful information as base directory and finalname:
<build>
  <defaultGoal>install</defaultGoal>
  <directory>${basedir}/target</directory>
  <finalName>${artifactId}-${version}</finalName>
  <filters>
    <filter>filters/filter1.properties</filter>
  </filters>
  ...
</build>
Profiles:
A profile the element contains both an optional activation (a profile trigger) and the set of changes to be made to the POM if that profile has been activated. By using you can customize the build for different environments such as Production/Test/Development:
...
  <profiles>
    <profile>
      <id>test</id>
      <activation>...</activation>
      <build>...</build>
      <modules>...</modules>
      <repositories>...</repositories>
      <pluginRepositories>...</pluginRepositories>
      <dependencies>...</dependencies>
      <reporting>...</reporting>
      <dependencyManagement>...</dependencyManagement>
      <distributionManagement>...</distributionManagement>
    </profile>
  </profiles>
It is possible to specify a default profile by using the value true for the child tag of the tag.
<profiles>
    <profile>
      <id>dev</id>
      <activation>
        <activeByDefault>true</activeByDefault>
      </activation>
      <properties>
        <ma.propriete>dev profile</ma.propriete>
      </properties>
    </profile>
  </profiles>
The power of a profile comes from its ability to modify the basic POM only under certain circumstances. Those circumstances are specified via an activation element.
For example, Maven allows you to activate a profile according to the version of the JDK used.
<profile>

<id>profile.java.5</id>
      <properties>
        <ma.propriete>Java 5</ma.propriete>
      </properties>
      <activation>
        <jdk>1.5</jdk>
      </activation>
    </profile>
    <profile>
      <id>profile.java.6</id>
      <properties>
        <ma.propriete>Java 6</ma.propriete>
      </properties>
      <activation>
        <jdk>1.6</jdk>
      </activation>
    </profile>
...
To see which profile will activate in a certain build, use this command:
mvn help:active-profilesIf you want to run the mvn clean install using another profile, run it with -P follow by the profile name:
mvn clean install -PtestBuild Lifecycle:
A Build Lifecycle is a suite of phases that define the order in which the goals are to be executed.
Maven’s default lifecycle (build) offers several default phases:
- validate: checks the correctness of the project
- compile: compile the project code source
- Test: Compile and run automated unit tests. These tests should not require the diffusible form of the artifact or its deployment in an environment.
- package: Creates the JAR/WAR… package as mentioned in the packaging in POM.xml
- install: Install the artifact in the local repository so it can be used as a dependency for other projects
- Deploy: Deploy the artifact in a dedicated environment and copy the artifact to the remote repository
Plugins and Goals:
A plugin is a Maven artifact: it is therefore identified by a group, an artifact, and a version number (by default, the most recent version). A plugin is a collection of one or more goals.
A goal represents a specific task that contributes to the building and managing of a project.
Example:
<build>
      <plugins>
         <plugin>
            <groupId>org.apache.maven.plugins</groupId>
            <artifactId>maven-antrun-plugin</artifactId>
            <version>1.1</version>
            <executions>
               <execution>
                  <id>id.pre-clean</id>
                  <phase>pre-clean</phase>
                  <goals>
                     <goal>run</goal>
                  </goals>
                  <configuration>
                     <tasks>
                        <echo>pre-clean phase</echo>
                     </tasks>
                  </configuration>
               </execution>

               <execution>
                  <id>id.clean</id>
                  <phase>clean</phase>
                  <goals>
                     <goal>run</goal>
                  </goals>
                  <configuration>
                     <tasks>
                        <echo>clean phase</echo>
                     </tasks>
                  </configuration>
               </execution>

               <execution>
                  <id>id.post-clean</id>
                  <phase>post-clean</phase>
                  <goals>
                     <goal>run</goal>
                  </goals>
                  <configuration>
                     <tasks>
                        <echo>post-clean phase</echo>
                     </tasks>
                  </configuration>
               </execution>
            </executions>
         </plugin>
      </plugins>
   </build>
Run this command to see the Maven process and displaying all the phases of the clean life cycle.
You can create your own plugin.
The Maven help plugin has a “describe” goal that displays information about a plugin. Run this command to see information about the help plugin:
mvn help:describe -Dplugin=helpA summary of the Maven main commands:
mvn package | Build the project to generate the artifact |
mvn site | Generate the documentation site in the target/site directory |
mvn -Dtest=<unqualified-classname> test | Run the unit test whose class name is provided |
mvn -Dmaven.surefire.debug test | Run tests with a remote debugger using port 5005. Surefire waits for the debugger to connect. |
mvn help:effective-pom | Show pom content including Super POMs |
mvn dependency:tree | Display a dependency tree, including transitive dependencies |
mvn clean | Delete files generated by previous generations |
mvn clean package | Delete the files generated by the previous generations and build the project to generate the artifact |
mvn install | Generate the artifact and deploy it to the local repository |
mvn -Dmaven.test.failure.ignore=true package | Build the project to generate the artifact even if the unit tests fail |
mvn eclipse:eclipse | Generate Eclipse configuration files from POM (including dependencies) |
mvn eclispe:clean eclipse:eclipse | Same but the previously generated files are deleted |
mvn -Dmaven.test.skip=true clean package | Delete the files generated by the previous generations and build the project to generate the artifact without running the unit tests |
mvn javadoc:javadoc | generate Javadoc |
mvn javadoc:jar | Generate the Javadoc in a jar file |
mvn --version | View Maven Version Info |
mvn test | Run unit tests |
mvn compile | Compile the project sources |
mvn idea:idea | Generate IntelliJ configuration files from POM (including dependencies) |
mvn release:prepare release:perform | Deliver the artifact (create a tag in the source manager and remove SNAPSHOT in the version) |
mvn archetype:create -DgroupId=com.elgarnaoui.test -DartifactId=MyApp | Create a new project in interactive mode |
In this Maven tutorial, we discussed some of the more popular features of the Apache Maven build tool.
Thank you for reading this post, Share it with your friends on social media, And if you have anything let us know in the comment section below.
Sources: